
Have you ever wanted to share your locally hosted
website with others on the internet? Whether you’re a developer looking to
showcase your work or collaborate on projects, Ngrok provides a straightforward
solution. In this tutorial, we’ll walk you through the process of sharing your
localhost with the world using Ngrok.
Step 1: Sign Up or Log In to Ngrok
To get started, visit ngrok.com and sign up or log in to your Ngrok
account. This will provide you with access to the tools you need to publish
your local website.
Step 2: Download the Ngrok Installer
After logging in, download the Ngrok installer/setup
file for your operating system, whether it’s Windows, Linux, or macOS. The
installation process is quick and straightforward.
Step 3: Unzip the File
Once the download is complete, unzip the file to a
location on your desktop or any convenient directory.
Step 4: Connect Your Account
Go to your Ngrok account dashboard, where you will
find a command that looks like the following:
ngrok config add-authtoken YOUR_AUTH_TOKEN
Copy the provided command, as it is essential for
configuring your account.
Step 5: Open a Command Prompt or Terminal
Open a command prompt (Windows) or terminal (macOS and
Linux) and navigate to the folder where you extracted the Ngrok setup files.
Step 6: Configure Your Account
In the terminal, run the copied command from Step 4
and hit Enter. This step links your local installation of Ngrok with your Ngrok
account.
You’ll receive a success message, indicating that your
account has been authenticated.

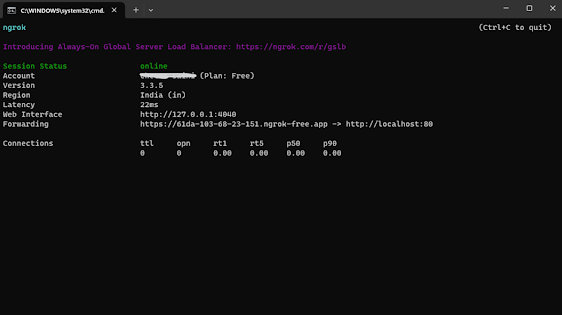
Step 7: Forward Your Localhost
Now it’s time to use Ngrok to forward your localhost
to the internet. In the terminal, enter the following command:
ngrok http 80
This command instructs Ngrok to forward port 80
(default for HTTP) to the Ngrok public server, making your localhost accessible
over the internet.
You will receive a public URL in the terminal, which
you can share with others. Alternatively, you can access the active public URL
from the Ngrok dashboard’s endpoints section.
Optional Steps: Forwarding Virtual Hosts
If you want to forward a virtual host, you can use the
following command, replacing virtualhosttest.test with your specific virtual
host and 80 with the corresponding port:
ngrok http --host-header=rewrite virtualhosttest.test:80
Conclusion:
With Ngrok, sharing your locally hosted website is a
breeze. You can quickly make your web development projects accessible to
clients, collaborators, or anyone interested in your work. In our next
tutorial, we’ll explore advanced features of Ngrok and discuss secure tunneling
practices to protect your shared content. Stay tuned for more exciting
tutorials!
By following these steps, you can easily share your
locally hosted website with others on the internet, making it accessible to a
global audience.